Showing posts with label garage. Show all posts

Friday, May 13, 2016

Color!

We have finally decided on a color for the house. It took a while since I had a whole list of parameters that needed to be met with this color. First, the color had to help the house look old (like 18th century old.) Second, I felt that one of the best ways to help make the house look old would be having the trim and windows match the color of the walls. Third, that meant I needed good samples of modern window exterior colors. Fourth, we had to decide on a window company to get their colors. Then to make matters more complicated, the Pella window store told me Sherwin Williams paints has the codes to all their colors. But a call to the Sherwin Williams store taught me that they knew nothing about Pella window colors. Ah, but Lowes has the codes. But not in a solid stain, just a paint. I really wanted to treat all the new wood with a solid stain rather than a paint. But Lowes did have a decent sized sample of Pella window trim in the color, Portobello, I was thinking of using. Using their color match system this is what we have come up with:
 And it looks nice on the new garage doors too. I love a color that changes colors in different light. This color can look gray, tan, brown, and greenish. And is a pretty close match to stink bug poop brown!
Eventually the whole front of the house will get new wood clapboard siding painted Portobello. This is my inspiration house from Colonial Williamsburg:
I think we came pretty close with the parameters I was using. We have the garage side door painted the darker color to see how it would look. I think the whole house will look more settled and a part of the land with the new color scheme.


Friday, April 29, 2016

Using Old Strap Hinges and Pintles

My first guest post! My husband Alan has been the brains and brawn of the construction around here. He is building the doors for the end bay of the garage and has started with the hinges.

We're committed to using old hardware when we can during the construction and renovation of our buildings. The latest project is putting doors on the tractor shed attached to the house. While salvaged strap hinges are plentiful in our area, due to all the German barns being torn down, the pintles are not. They are so difficult to retrieve from the old timber frames that they often get destroyed or buried with the rubble. When you can find matching sets of hinges and pintles, you grab them whether you need them or not. As old pintles were made for thick timber frames they do not adapt to today's standard construction. So time to make old technology fit new technique.

The old hand forged iron pintle


In the image below the 2"x8" board represents the new door frame jack studs.  The smaller 3/4" board on the left is the exterior siding. The old pintle is too long, the threads are buggered, and the hole to be drilled to accept the square shank needed to be to large and could weaken the jack studs.

First thing is to cut of the shank from the hinge pin.

Next cut the new 3/4" threaded rod to the proper length

Mocking it up to make sure we're on the right track. Note the remaining length of square shank on the pin will be sunk into the siding, so a square hole will need to be chiseled into the board after the 3/4" hole is drilled through the jack studs. This square "socket" will help keep the hinge pin plumb and not rotate out of alignment from the weight of the door over time.

Set up for welding


The welded threaded rod and pin next to the old shank. We'll keep the hand forged shank and square nut for future unknown projects or perhaps give it to an iron smith to be reworked for another purpose.

The complete assembly with the 30" heavy iron hinge. These will be used for a set of 48" wide wood plank carriage house style doors to close an 8' opening.

Sunday, January 10, 2016

Adding Planks to a Paneled Door

The little side door to the garage had a great little window but was old, out of square, and a little too small. The old doors with planks on one side and a paneled door on the other side are a cool design and would shore up the old door. We also needed to change the swing of the door. You can just make out the doorknob on the right hand side of the door. The door swung out into the bush. We wanted the door to swing in like a proper door.
When Alan squared up the door jamb he needed to add a bit to the door so it would fit. He also made it mostly square again.
Then he added the planks to the door. The panels were slightly recessed from the door frame so he had to pack those out.
The planks are joined with a ship-lap joint and each plank gets planed for a little V-groove.
Then the planks are glued and clamped to the panel door.
The planks around the window get trimmed out and a little sill was added.
Plotting out the nail pattern took a while. I wanted a diamond pattern, but couldn't have a nail too close to the edge of the door, in a seam, or in a knot. The pattern also needed to work out so that a single row could go across the boards above the window. A 4x7 diamond pattern worked out just right.
Then the pattern was scribed into the wood with a nail.
Each point where two lines intersect had a hole drilled,
and then a nail hammered in.
Unfortunately, the old wood of the paneled door did not take kindly to having a cut nail hammered in.
We had planned on using longer nails and clinching them over on the paneled side of the door but at the last minute Alan decided to not clinch the nails and bought shorter nails. We don't know if the longer nails would have made a difference, but drilling a deeper hole did make a difference. A little putty and paint and you won't be able to tell there was a problem.
The door is now hung and weather-stripped. The latch wasn't supposed to arrive until the 13th but showed up on our door step on the 9th.
All we need now is the dead bolt installed and a coat of paint I am hoping that the scribe marks will just barely be visible once the door is painted. Really, we will use a solid stain.


Monday, November 2, 2015

A Glimpse of the Future

Sometimes the hardest part of a renovation project is the waiting. I have become a lot more patient over the years but it's nice, every once in a while, to see some progress and see your vision come to reality. We reached that milestone this weekend on the garage wall. Alan hung the new doors he made using the cool spear strap hinges and the latches. And he hung an onion light fixture we had leftover from the old house. I think it looks pretty nice.
The decision making on paint colors has been rough but I think we have finally decided on something like this house:
But I need to figure out the windows we will be using since I want the clapboard color to match the color of the exterior of the windows. It will be some variation of a taupey/grayish color. Hopefully the stink bug frass will blend in better than on the white.

Friday, October 30, 2015

Garage Update

Work on the garage is continuing, both inside and out. The gable end is nearly finished getting it's siding and the doors have been made for the attic storage area.

We got some nice strap hinges from Van Dyke's.
The inside of the garage/shop area is coming together too.

All the insulating, drywalling, spackling, and painting is done. Alan picked up a great stainless steel slop sink. He is finishing up the surface conduit/wiring then it is time to move in. Most of his shop has been stored in a friend's barn. It will be nice to have everything he needs to work on the rest of the house here in the shop instead of 15 minutes away.

Monday, September 21, 2015

Odds and Ends

We've been on a push to get a lot of landscaping projects finished up. I finally got the last of the grass seed and straw down...
and the grass is starting to come up around the front/side of the garage. A week and a half ago we had four inches of rain in three days and nothing since. But that was enough to get the first grass planting off to a decent start. We had a scant shower this afternoon and maybe more to come later today but nothing in any measurable amount is predicted.

Liming is coming along. I have the largest, and highest elevation, pasture to go. Pushing heavy lime up our hills is not fun.  And since we haven't gotten any rain yet, all the sheep are in small paddocks waiting for the lime to get watered into the grass. They seem to be liking the hay I've been giving them in lieu of grazing though.

Alan was able to get a little framing of the gable end wall over the garage. Next up siding.

Thursday, September 10, 2015

Rain, Rain, Don't Go Away, and Come Again Next Week Too!

Finally, we have rain. While it was a good thing it was dry while we were digging up everywhere, it was getting really dry. It got so dry we couldn't work on the landscaping because the soil was pure dust.
With rain in the forecast I got the area next to the garage raked, seeded, and spread straw to hopefully keep the erosion down. But we still have the backyard up to the barn to take care of before we can plant there.
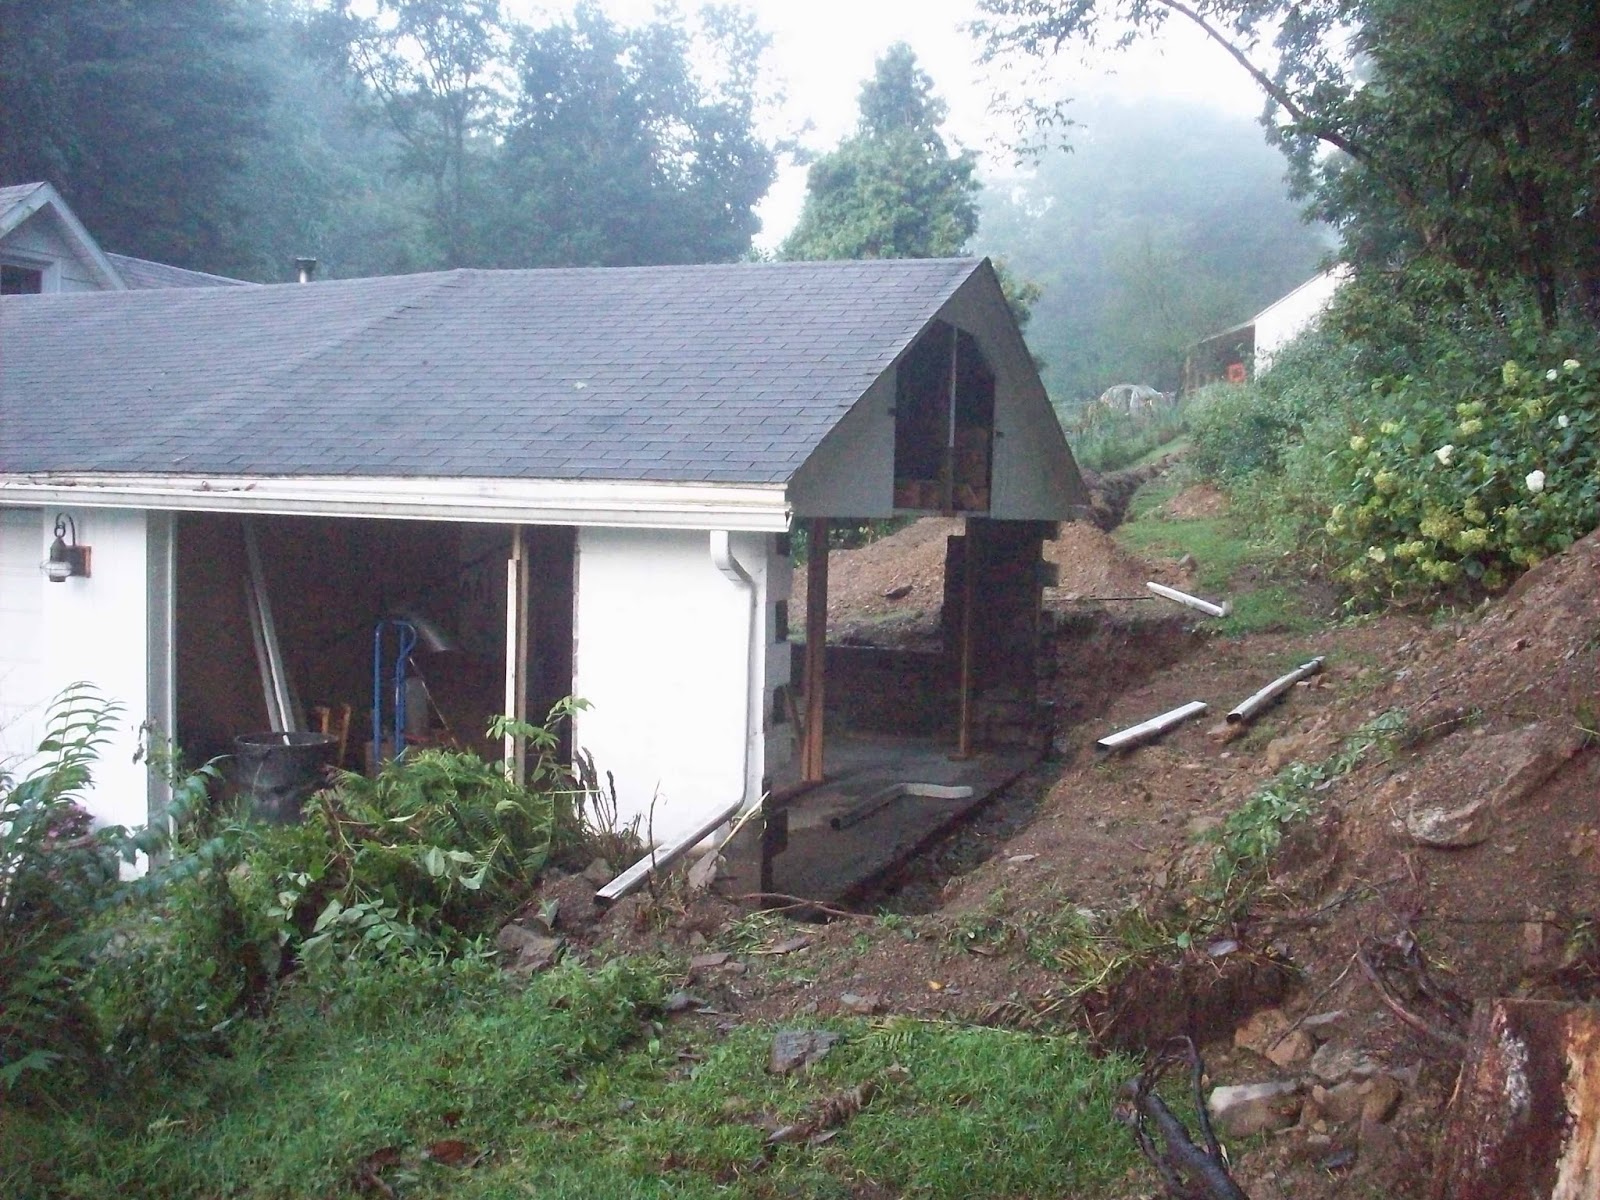
Alan hooked up the down spouts to the drain system which also drains the ground next to the new block wall to keep the water from building up, freezing, and pushing out the wall again. It all comes out here.
I hope we are into a better rain pattern so the grass will grow, but not so wet we can't work the rest of the yard to plant more grass.


Monday, August 31, 2015

Lots of Progress!

Alan had a very busy weekend getting the water line into the house.  Our well is in a concrete "bunker" next to the house and the water line goes out of the bunker and into the house.
Alan wanted to have the water line to the barn attach in the basement so he could have more control over it, but that meant getting through the bunker. A hammer drill on the outside down in a ditch wasn't working so that meant he had to go down into the bunker and drill from the inside.
But that tank from the old jet pump system was in the way. And the hole in the lid of the bunker wasn't big enough to get the tank out. So Alan took out a corner of the lid. Why they just didn't make a bigger hole when they poured the lid is beyond me. It was so small a normal sized man had trouble getting through it.
Once the tank was out of the way Alan had lots of room to cut the hole for the water line. Getting into the house was the easy part. The current line from the well had plenty of room for another line to
slide right in next to it.

Today the contractors were here with a crew. The mason put the scratch coat on the block. The drain tile was laid and then the area was backfilled.

The area around the garage and driveway was graded to make it possible to mow and the parking area was enlarged.
Tomorrow we get more stone spread in the parking area and up by the barn where it was all torn up getting the water line dug. And the mason should be back to put the finish coat on the parging. Alan hopes to move back in to the third bay of the garage this weekend which will give me more room in the barn, yay!

Thursday, August 27, 2015

It's a Block Wall!

Yesterday the mason was very busy! It is so nice to have level walls.
The back wall is up too. They are supposed to be coming tomorrow to parge the exterior.  The contractor stopped over today to discuss the grading work we want done. Hopefully everything will be finished sometime next week. Then Alan has to frame in the doors, make the doors and figure out what we are using for siding and colors. Decisions, decisions.

Monday, August 24, 2015

More Progress

Alan had a very busy weekend putting screened soil around the water line (don't ask what happens when a water line has sharp rocks around it), filling the trench part way, then laying down electrical conduit and finishing the back filling.
He has about half the conduit buried and all the water line buried. Still to come is getting the water line into the house and connected to the line from the well. Then it's major landscaping time.

The contractor came today and took down the rest of the old block wall. It looks like we have a carport.

I am guessing the mason will be coming soon. I am glad Alan only has the trench to work on right now. Originally he wanted to replace the wall but we had the money and there are so many other jobs he could be working on. He is one tired man after working on the trench all weekend.

Friday, August 21, 2015

Progress

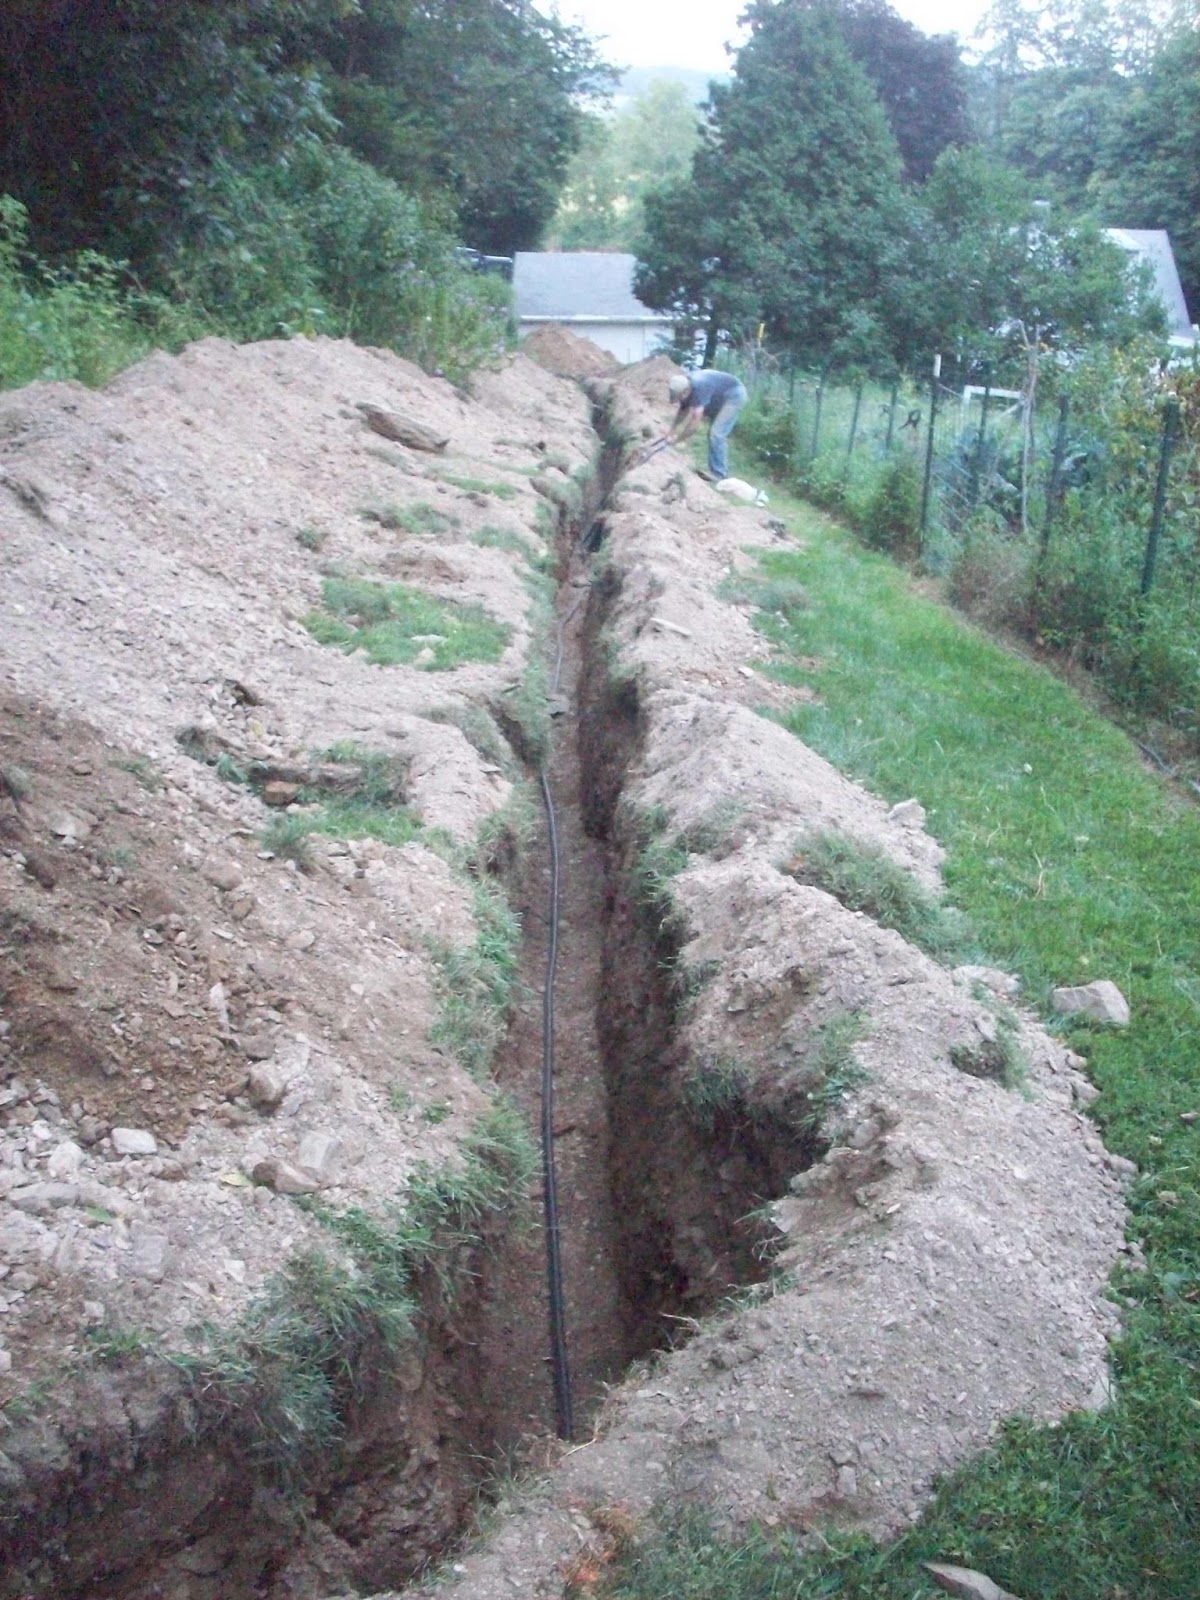
On Day 1 (Wednesday) the young guy with the excavator dug the trench up to the barn:
and dug out most of the soil around the end bay of the garage.
Alan then laid the water pipe in the trench since the weather forecast was calling for heavy rain in the next 24 hours and we were afraid too much soil would get washed into the trench.
Next up for the trench is some backfill then laying the conduit for the electrical line, more backfilling then seeding. Alan will be doing all that work himself.

 On Day 2 I went to work in the dark and came home in the dark. This morning I awoke to this:
It looks like a tornado came through here.
Can't wait to see what next week brings!


Wednesday, August 19, 2015

Soon! Water in the Barn!

Today is a big day. The day I have been waiting for since early spring when I wrote out the deposit check for work on the barn, the trench to bury the water and power lines to the barn, and the replacement of the wall on the north end of the garage.

The sheep and I have been enjoying the barn overhang/addition for a couple months, but I was eager to get water up to the barn and have the wall replaced.

The beginning of the trench up to the barn!

Once the trench is dug Alan will lay water pipe and the power line and fill in the trench. It will be so nice to have water up in the barn this winter. No more carrying buckets of water or sliding around pulling the ice sled. The 275 gallon tote we used last winter in the barn was great until it got really cold (like 14 degrees fahrenheit) and froze solid. We now have a series of hoses we use in the warmer months that run up through the garden, to the barn, across the stream to the ram's pasture, and over to the chickens' pen. We will definitely be able to get rid of some of those hoses. Alan will put a yard hydrant at the garden too.

I am also excited to get the end and back wall to the third bay of the garage replaced. Every time I look it seems worse.
That is daylight coming through the crack next to the spider. There are multiple places where daylight is shining through. One block can even be taken out and put back in by hand. We warned the guy digging that the wall might collapse once the soil supporting it is taken away. It's a strange concept; the ground that is pushing the wall in and making it unstable is also what is holding it up.  It's nice to see some big things happening.


Tuesday, August 11, 2015

Shop Update

Alan has been on a push to get his shop finished. In the past month he got all the drywall up and spackled.
He bought a door and jamb to replace the antique interior door that was being used as the back door for the garage. Now to get the jamb and door installed.
Next up is paint, then cabinets, workbench and electrical conduit. The cabinets have been sitting in the garage for over a year. And Alan picked up a great stainless steel sink.